Zapier Integration
Introduction
Aerofiler can integrate with applications via the Zapier platform. This page steps through an integration with Salesforce, which typically will involve three types of data flows:
Initiating a document workflow from Salesforce data
Synchronising data from Salesforce to Aerofiler
Synchronising data from Aerofiler to Salesforce
We will examine each of these in turn.
1. Document Workflow from Salesforce Data
A. Generate URL in Aerofiler
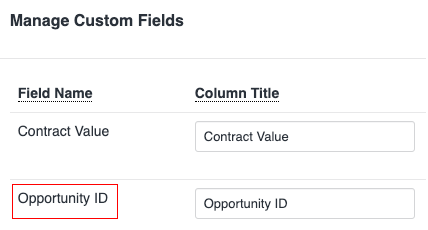
Let's assume that we wish to synchronise Salesforce Opportunities to Aerofiler. The first step is to create a custom field to link contracts in Aerofiler to Salesforce objects. The field should be of type "Text". There is no mandatory name, but here we recommend "Opportunity ID" to match the name in Salesforce.
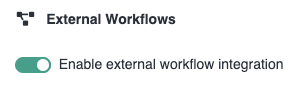
Once the custom field is created, click on "Integrations" in the left hand menu:

Under "External Workflows", toggle on the "Enable external workflow integration" setting:
Select "Opportunity ID" as the field:

This will generate a URL, which you copy to the clipboard by clicking the "Copy" button:
B. Create custom button in Salesforce
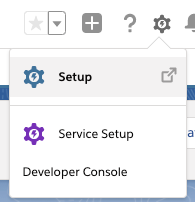
The next step is to create a custom button in Salesforce which will link to Aerofiler. In Salesforce, click on Setup:
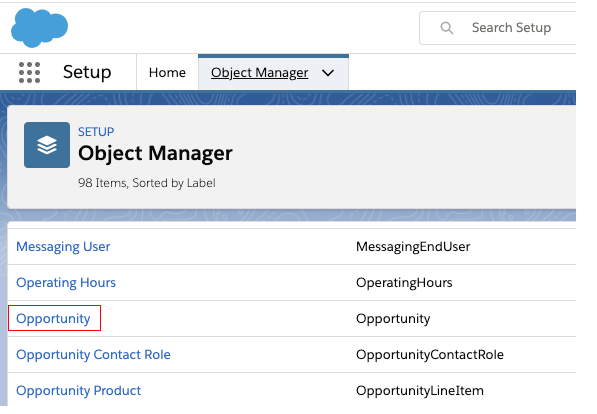
and then choose "Opportunity" in the Object Manager:
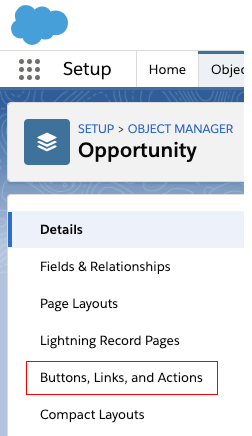
Then select "Buttons, Links and Action":
Click "New Button or Link" and then proceed with your chosen label, for example "Generate Contract". In the text area, you can now paste the link that you copied from Aerofiler. Then, select the text in square brackets (boxed in red below):

Afterwards, click on "-- Insert Merge Field --" and select "Opportunity ID". This will complete the rest of the link to Aerofiler:

Now, click "Save". The custom button is now available to be added to Salesforce opportunities.
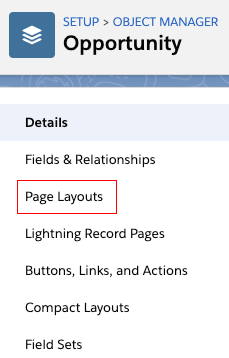
C. Add Custom Button to Opportunities
To add the custom button to all Opportunities, begin by clicking "Page Layouts":
Select the relevant layout, for example "Opportunity Layout":

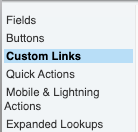
Then click "Custom Links":
You can then drag the "Generate Contract" button:
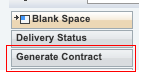
into the "Custom Links" section:
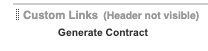
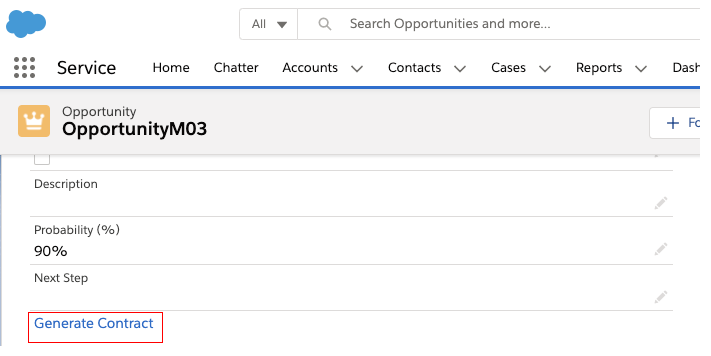
After saving, a "Generate Contract" link should then appear with every Opportunity:
D. Setup Zapier Workflow
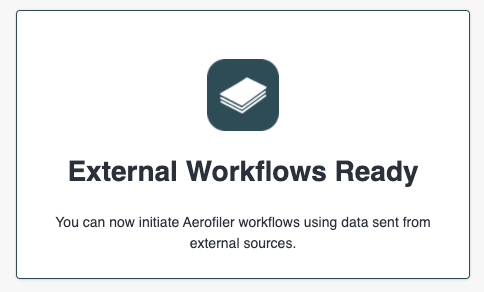
Go to any opportunity and click the "Generate Contract" button. You may be asked whether you want to leave the page and be directed to Aerofiler. If so, confirm that you wish to leave (and optionally check "Don't warn me again"). You should then be redirected to the following page in Aerofiler:
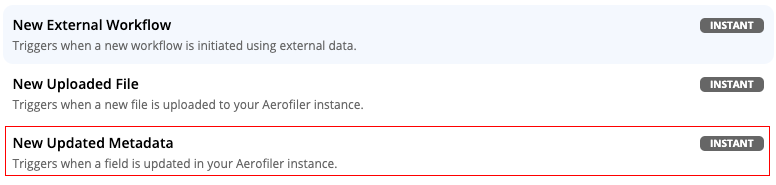
In Zapier, create a Zap. For Step 1, Aerofiler should be the application chosen. If needed, go to the Zapier integration instructions and create an API key and authenticate the Aerofiler application. Here, the event chosen should be "New External Workflow":

When testing the trigger, you should see both an Aerofiler Workflow ID and an Opportunity ID:

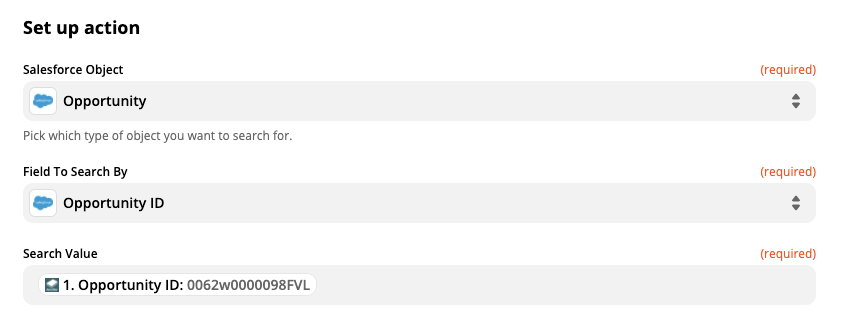
In Step 2, choose Salesforce as the application. For the event, choose "Find Record" and search for the Opportunity using the Opportunity ID from Step 1 above:
In Step 3, choose Aerofiler as the application. For the event, choose "Create Workflow From External Data":

The only mandatory field is Aerofiler Workflow ID, which is selected from Step 1:

If, after the contract is executed, you still need to synchronise data between Salesforce and Aerofiler, you should map the Opportunity ID to your workflow as follows:

All other field mappings are optional. Here is an example of how you would map the "Amount" field in Salesforce to the "Contract Value" field in Aerofiler:

Note: This is the point at which you should map all fields that require synchronisation. For example, if you have:
Statement of Work which requires "Amount" in Salesforce to be mapped to "Contract Value" in Aerofiler
Services Agreement which requires "Service Type" in Salesforce to be mapped to "Service Description" in Aerofiler
then here you should be setting up both the "Amount" and "Service Type" mapping.
After Step 3, the setup is complete and you can turn your Zap on by clicking Publish:

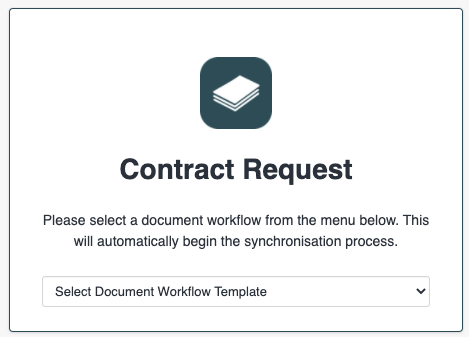
Next time you click "Generate Contract" in Salesforce, you should be redirected to the following screen in Aerofiler:
It may take several seconds for the data to synchronise from Salesforce. When that is done, you should be redirected to the Document Workflow page with data pre-filled from Salesforce.
Important: When data is updated in Salesforce, it may be cached for a short period. Therefore, if you update a value in Salesforce and immediately click "Generate Contract", old values may be sent to Aerofiler.
2. Synchronising data from Salesforce to Aerofiler
Suppose we want updates to the "Amount" field in Salesforce to synchronise to the "Contract Value" field in Aerofiler. Here are the steps in Zapier:
A. Prerequisites
This synchronisation requires a contract to be setup in Aerofiler, linked by Opportunity ID. This link is created in Step 1 above.
B. Zapier Step 1 - Setup a Salesforce trigger
The trigger should be "Updated Record":
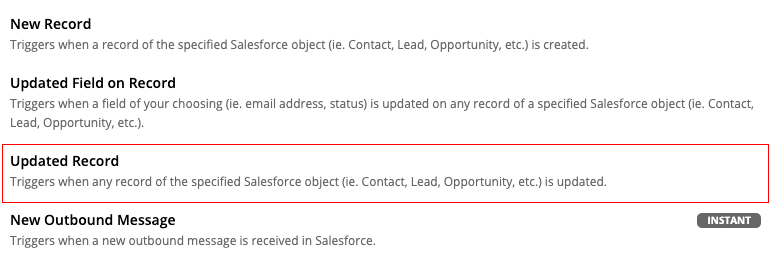
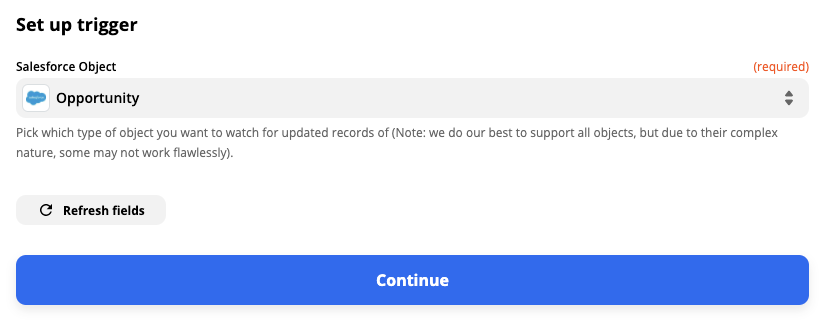
The Salesforce Object should be "Opportunity":
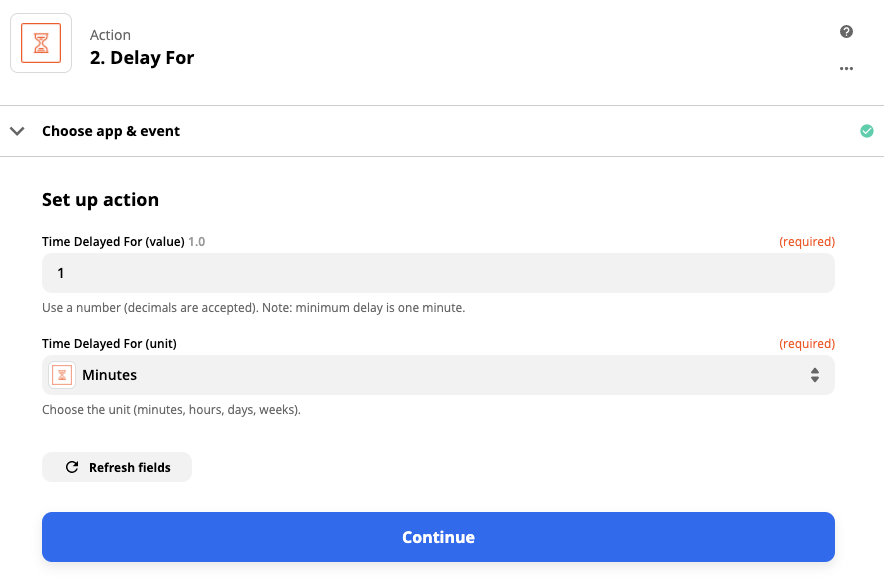
C. Zapier Step 2 - Setup a Zapier Delay Action
In the next step, we recommend setting up a delay of 1-minute to allow the data to synchronise:
D. Zapier Step 3 - Find Salesforce Record
The next step should be to find the record in Salesforce that was recently updated:

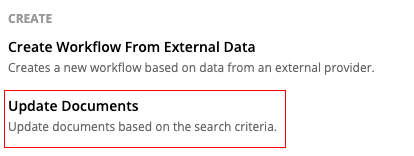
E. Zapier Step 4 - Setup Aerofiler action
In the fourth and final step, the Aerofiler action should be "Update Documents":
For the "Aerofiler Field Name", copy the relevant field name (here, "Opportunity ID") from your Aerofiler account:
For the "Aerofiler Field Value", select the relevant field value from the "Find Salesforce Record" step:
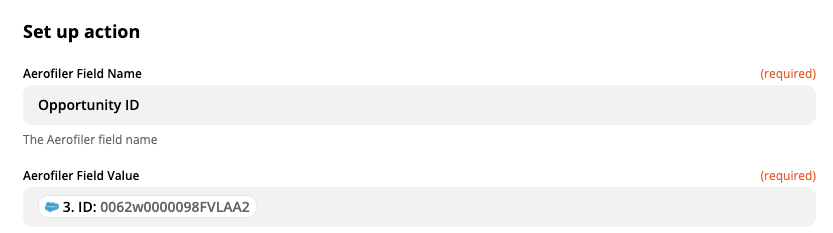
This will update all documents in Aerofiler where "Opportunity ID" equals 0062w0000098FVLAA2. The final step is to select one or more values to update. Here, we want the "Contract Value" in Aerofiler to be set to the "Amount" from Salesforce:

3. Synchronising data from Aerofiler to Salesforce
Suppose we wish to synchronise the "Counterparty" field in Aerofiler to the "Opportunity Name" in Salesforce.
A. Zapier Step 1 - Set up an Aerofiler trigger
The trigger should be "New Updated Metadata":
This trigger will return the most recent document in your Aerofiler account. That document should have an Opportunity ID populated with a value from Salesforce.
B. Zapier Step 2 - Set up a Zapier filter
Setup a Zapier filter so that the steps only continue if Opportunity ID does not contain Unknown:
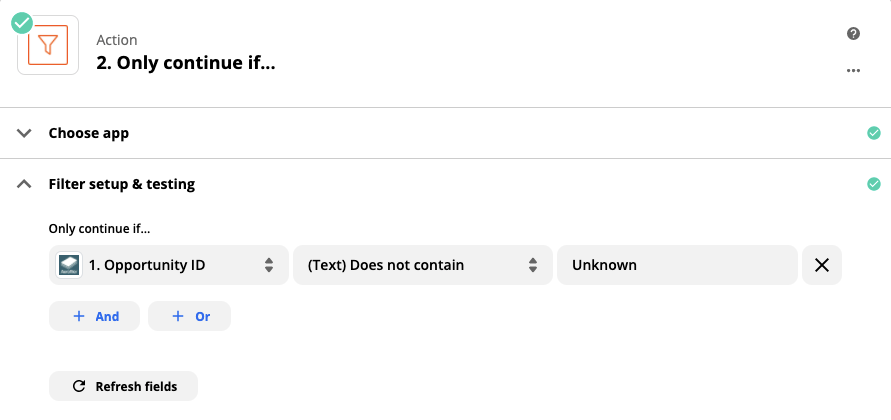
This will prevent Aerofiler contracts without a valid Opportunity ID from being sent to Salesforce for synchronisation.
C. Zapier Step 3 - Set up a Salesforce action
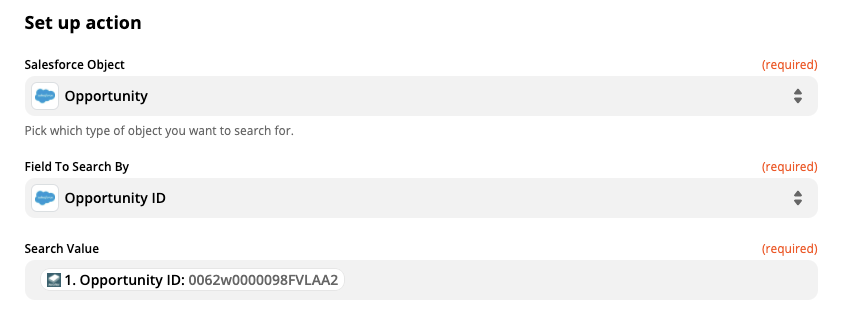
The Salesforce action should be "Find Record in Salesforce", where we search by Opportunity ID:
D. Zapier Step 4 - Set up a Salesforce action
The Salesforce action should be "Update Record". The Salesforce Object should be "Opportunity", ind in "Record to Update", choose the "Custom" tab and select the record from Zapier Step 2 above.
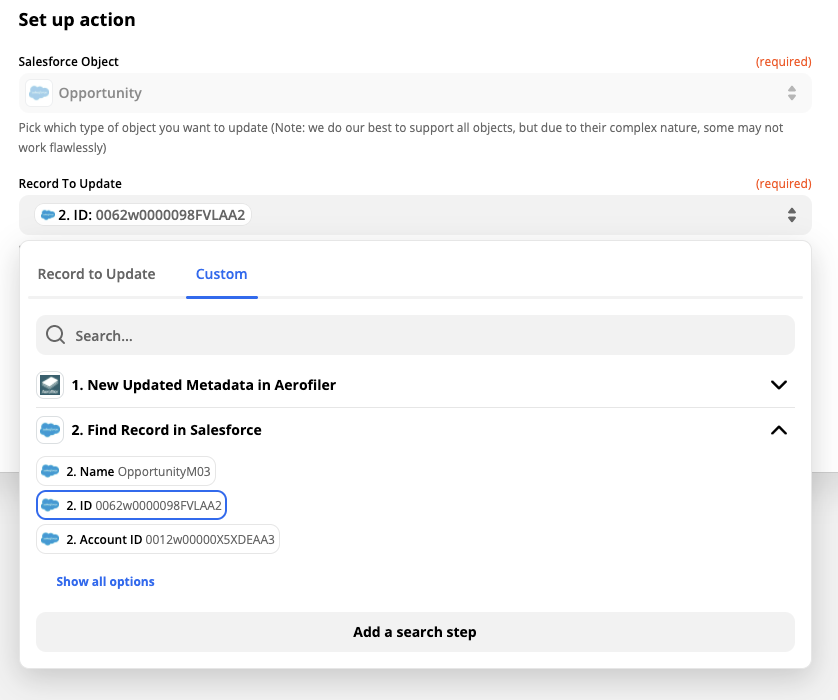
Then, choose the fields to update. Here, we're updating the Opportunity Name in Salesforce with the value from Counterparty in Aerofiler:

4. Hints and Tips
Data Compatibility
Currently, the "--None--" value in Salesforce Picklists is not compatible with the "<Unknown>" value in Aerofiler Lists. If you wish to to synchronise that value, create an "<Unknown>" value in the Salesforce Picklist.
Last updated